
It is an established fact that Facebook is the ultimate lord of social media. It has an extensive user base that’s comparable to a mid-size country’s population.
But many marketers have felt the burn of this intricate platform. Some even claim that the organic reach is dead, and ever-changing algorithms can blow you out of the game altogether.
Caught up in a dilemma, marketers often include the platform in their arsenal, but soon their plans go haywire with little output. Mostly because they are unable to incorporate the power of ads with organic posts.
While organic posts are a no-brainer, managing ads needs some fine-tuning. Without a good Facebook ads strategy, you miss out on a potential 2.89 billion monthly user audience on Facebook.
What a bummer, right?
The good news is that Facebook Ads Manager isn’t as challenging to set up as you thought it to be.
This blog walks you through the whole process, covering the basics of setting up and navigating a Facebook Ads Manager account, so you can get in front of an audience that cares about you.
As a bonus, we’ll also tell you how to create Facebook ads and use the Facebook Ads features to simplify things even further.
Let’s dive in.
What is Facebook Ads Manager?
Ads Manager is the command center for Facebook Ads. You can use the tool to view, change, and analyze all components of your Facebook advertising.
The tool has other cool features that let you customize your ad strategy, but I won’t overwhelm you with that upfront. It’s more important right now to understand precisely where Facebook Ads Manager sits in the big picture of your Facebook ad game.
This image will ground you in the Facebook Ads Hierarchy:

In my experience, people often want to jump straight to creating ads (the little orange dots on the bottom), which is a mistake. Facebook Ads Manager acts as an umbrella for your ad account.
The organization you observe above makes it possible for you to create impactful ads that have a measurable purpose beyond the image and line of text people will see on their feed.
Now, enough of what Facebook Ads Manager is, let’s move on to how you get there and how you get going.
How to Get to Facebook Ads Manager?
First things first, here’s a direct link to Facebook Ads Manager.
You can also access the tool directly with the Facebook Ads Manager app. To be honest, I still prefer using the desktop version.

Finally, you can access Facebook Ads Manager directly from the Facebook home feed. On the left panel, click ‘See More’ and scroll down. Select ‘Ads’ to navigate to Facebook Ads Manager.
That’s it! Reference these directions for future ad campaigns. Keep reading for a full walkthrough of the Facebook Ads Manager account set up.
How Do I Set up My Facebook Ads Manager Account?
Getting started with advertising on Facebook is easy. We’ll periodically remind you about our ads hierarchy chart, so you always know on what level we’re working.
Step 1: Create a Facebook Business Manager Account
Facebook Business Manager sits at the top of the Facebook Ads hierarchy.
If you’re new to using Facebook ads, you’ll first need to set up a business account. The Business account allows you to manage multiple ad accounts, add members of your team to those accounts, and get business-related reporting for relevant Facebook pages and accounts.
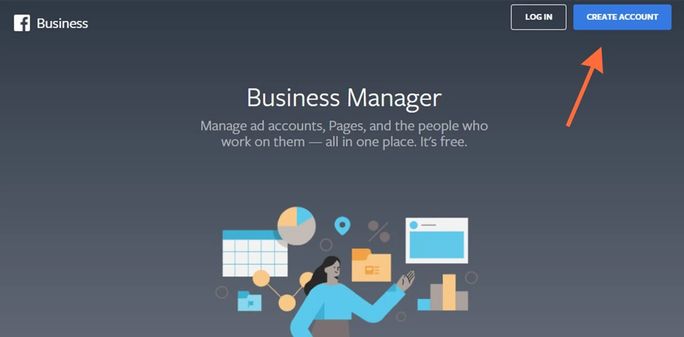
1. Navigate to the Business Manager Site
The first thing to do is go to business.facebook.com and click the blue ‘Create Account’ button.
2. Log in
From there, log into your personal Facebook account. A word of caution: you may be tempted to create a new Facebook account to separate business from personal.
However, this usually ends with frozen advertising work or banned accounts (Facebook despises duplicates). Seriously, you’ll be grateful you used your personal account.
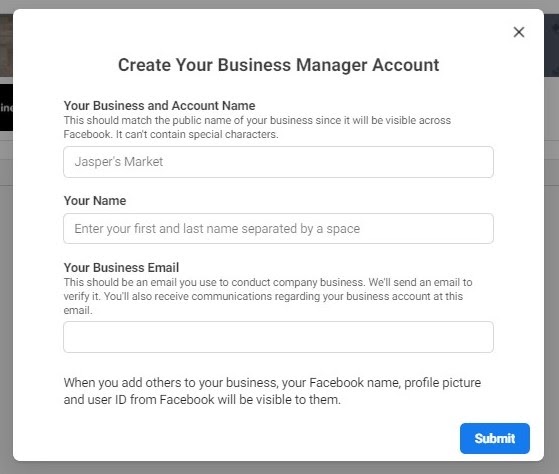
3. Fill out the Information in the ‘Create Account’ Pop-up
- Business name
- Your name
- Business email
- Click ‘Submit’
- Business address
- Business phone
- Website URL (if you don’t have one yet, your Facebook profile URL works just fine)
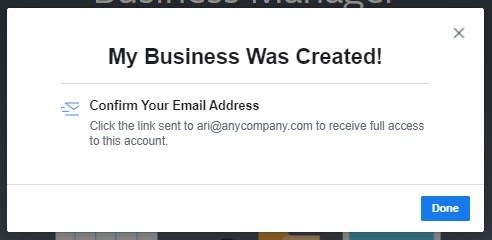
4. Verify Your Email Address
And that’s it! Keep up the momentum and get going through the next step: set up advertising access for your business.
Step 2: Set up Advertising Access through Facebook Business Manager
Congrats!
You jumped the hurdle of setting up a business account.
We’ll associate your Facebook business profile with potential partners, your businesses page, and your ad account in this step. Doing so will allow Facebook to keep track of the important bits of information you’ll want while running ads later.
To start, click the triple bar at the top of the Business Manager page and select ‘Business Settings.’

1. Add Partners
If you’re not working with an agency, don’t worry about this step. If this does describe you, add partners to your business page by selecting the ‘Users’ dropdown menu and clicking on ‘Partners.’
You have two options:
- Partner to share assets with: Give a partner access to your ad account.
- Partner to request assets from: Ask for permission to work on someone else’s account.
2. Add Your Business Page
On the ‘Business Settings’ panel, click the ‘Accounts’ dropdown, and choose ‘Pages.’
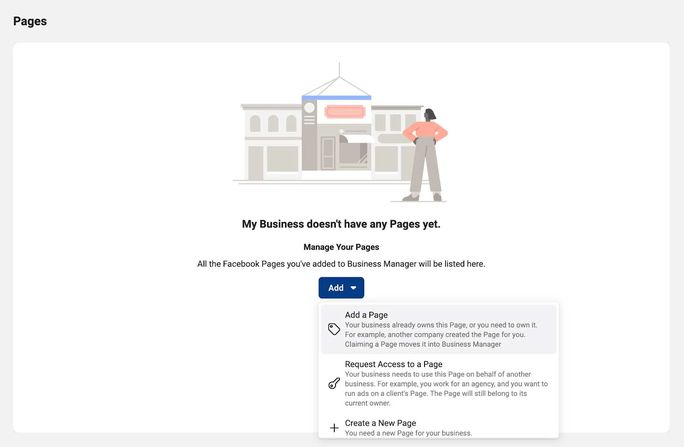
Hit the ‘Add’ drop-down and click ‘Add a Page.’ Then type in your page’s name to associate it with your account. If you don’t have a business page, you can set one up by selecting ‘Create a New Page’ and clicking the relevant business category.
3. Add Your Ad Account
Adding an account is pretty straightforward. Just go to ‘Accounts’ in ‘Business Settings’ and choose ‘Ad accounts.’
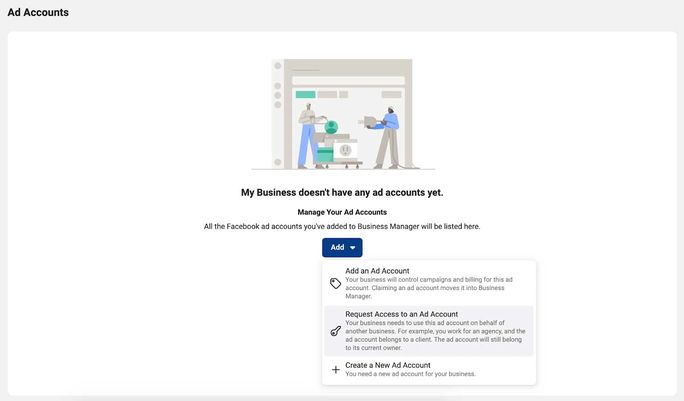
In the ‘Add’ dropdown, you can:
- Add an ad account
- Request access to an ad account
- Create a new ad account
4. Submit Your Business Information
Once you add your ad account, the next thing you need to do is scroll to the bottom of the panel in business settings and go to ‘Business Info.’
Click the ‘Edit’ button for ‘My Business’ and select your primary page — aka the business page you just set up in step 2.
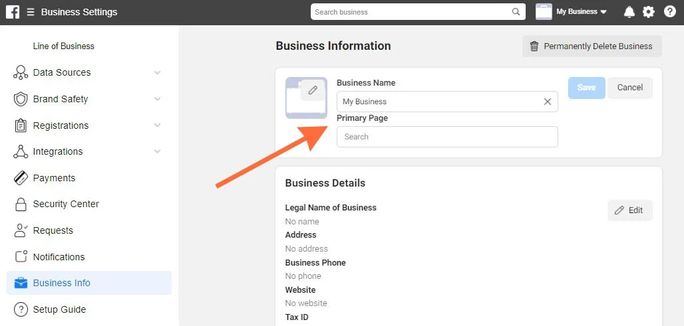
While you’re here, you can add other information like your website, address, etc.
And that’s it! Your account is all set up. All that’s left is to add a Facebook Pixel, which will help Facebook do all the magic audience tracking when ads run.
Step 3: Create a Facebook Pixel
So what is a Facebook Pixel? A Pixel is just a snippet of code you put on your website. A Facebook Pixel will help you track user behavior to:
- Bring back website visitors using retargeting on Facebook (Custom Audience).
- Allow Facebook to find new people most likely to convert to your ad offers (Lookalike Audience).
- Get reports in Ads Manager about conversions, audiences, and your website visitors.
You’ll want to put one on each of your main websites and landing pages. Business Manager will let you create up to 100 pixels.
Here’s how to create your Pixel:
- Go to Ads Manager, then Events Manager.
- Click the + button labeled ‘Connect a Data Source’ and choose ‘Web’.
Select ‘Facebook Pixel’ and hit the ‘Connect’ button.
- Name your Pixel.
- Type in the website URL you want the Facebook Pixel to appear and run through the provided setup options.
Managing Your First Facebook Ads Campaign
Now that you’re familiar with the Ads Manager tabs, here’s a breakdown of everything from setting up a new campaign all the way to placing an order for your first ad.
But don’t forget to add the payment details before creating new ads on Facebook
Step 1: Create a Campaign and Choose a Campaign Objective
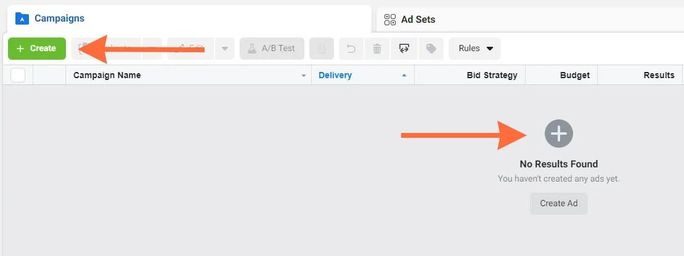
To create a campaign, navigate to the Campaign tab.
You can make your first campaign by clicking + Create ad in the center of the page or the green + Create button underneath the campaigns tab.
This is where we’re going to set your marketing objective for the campaign. Marketing objectives help specify your goals for campaigns and ads. Specifically, what are you trying to accomplish with your ad campaign?
Also, notice that Facebook’s campaign objectives align with primary marketing funnel stages (a way to break down your customer journey).
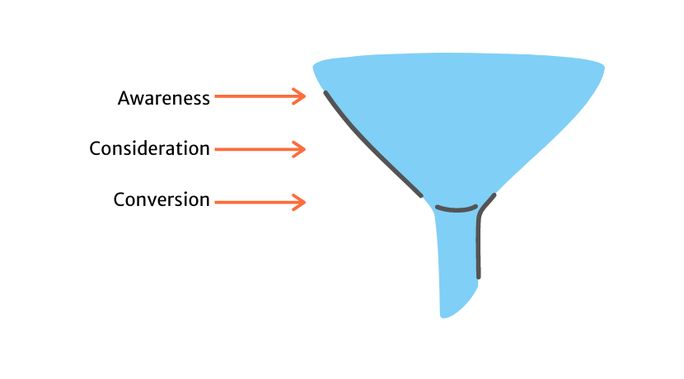
So which business goal aligns with the objective types?
Let’s look at some of them:
- Brand awareness: Show your ads to people who are most likely to remember them.
- Local awareness: Like brand awareness, but in a particular geographic area.
- Reach: Show your ads to the maximum number of people.
- Traffic: Send people somewhere (e.g., website, app, Facebook event).
- Engagement: Reach users likely to engage with a post.
- App installs: Serve your ad to people most likely to go to your business’ app.
- Video views: Get your video ad seen by people most likely to watch it.
- Lead generation: Collect business leads; collect information from people interested in your product (e.g., with a newsletter sign-up form).
- Messages: Engage with current or likely customers on Messenger, Instagram direct messages, WhatsApp.
- Conversions: Drive action on your website (e.g., download a whitepaper, sign up for a trial, call a number, make a purchase).
- Product catalog sales: Showcase a variety of products to boost sales (mainly e-commerce).
- Store traffic: Boost ads for people near your store or business location.
That’s it! Select your objective and name the campaign.
Step 2: Create a New Ad Set
To create a new ad set under the same campaign:
- Make sure you’re in the Ad Sets tab.
- Click the ‘Create’ button > ‘Use Existing Campaign’.
- Select the correct campaign name.
- Name your ad set.
- Hit ‘Continue’.
Step 3: Set a Budget & Schedule
We’ll set an ad set budget first. You may have noticed another budget option while you set up your campaign. Please note the option of setting budgets at the campaign and ad set level.
Whether you set your budget at either level is your choice; just note that you cannot set different budgets for the ad sets within that campaign if you already set a campaign budget.
Daily Vs. Lifetime media spend
You have the option of setting either a Daily Budget or a Lifetime Budget.

With a Daily Budget, Facebook will, on average, spend up to the amount you specify each day the ad is running. This amount may be over or under the exact amount day by day, depending on the ad opportunity.
In contrast, Lifetime Budget is the total amount that Facebook can spend over the ad’s entire run period.
Your choice depends on your objectives; just remember that you can’t edit this after you create your ad set.
How much should you spend?
For new campaigns, we recommend you set a small budget to start. Why? Because Facebook will take a minute to learn about your audience. In other words, you don’t want to waste money on ads or audiences that aren’t optimized yet.
So it is best to start small, wait a few days for some results, and adjust your budget accordingly.
CPC Vs. CPM
While we’re thinking about budgets, consider two important Facebook metrics: cost per click (CPC) and cost per mile (CPM).
Cost per click is Facebook’s default setting; you’ll only pay for clicks on your ad. In contrast, you pay for every thousand impressions (engagement with your post) with CPM.
Step 4: Choose Your Audience
This step is where we’ll choose our audience — the type of Facebook members you are trying to reach with your ads.
You can filter your desired audience in different ways. Here are a few:
- Custom audiences: You’ll need a functioning Facebook Pixel and a bigger data set here. Eventually, you can create custom audiences from users who have interacted with your brand previously. Leverage additional actions or purchases from these audiences using retargeting.
- Location: The larger the geographic area you choose, the more broadly your ad will show. You can also filter the location to people living in, recently in, or traveling through the area.
- Age: This is self-explanatory; however, I’d just recommend keeping your age range pretty wide for new campaigns – you can always come back and test later!
- Gender: You can target men, women, and all.
- Detailed targeting: A big reason people love Facebook ads is the audience targeting. There are limitless combinations of demographics, interests, and behaviors to choose from.
Step 5: Choose Where to Run the Ads
Now that you’ve chosen the audience, where exactly will the ads appear on the platform? We call the location ads run on Facebook placements.
You have the option to choose Automatic Placements or Manual Placements. Facebook recommends selecting Automatic Placements – it’s less of a headache and allows Facebook to work its magic and optimize your campaign for you.
Placement options will change depending on the objective you selected for your campaign and the platform you’re running it on. For example, Instagram placements will have a different look and feel than those on the Facebook home feed.
And you’re done! Hit ‘Next,’ and you can start creating your ads.
Step 6: Choose Your Ad Format
Under ‘Ad Setup,’ select the dropdown for ‘Create Ad.’ Just below, you’ll see a few options for your ad format with placement previews for your selection.
You’ll see more or less formatting options depending on the objective you selected when you set up your campaign.
There are several ad format options to choose from:
- Carousel Ads: Multiple images your audience can interact with. The increased ad real estate lets you tell a more complex brand story.
- Image Ads: The classic ad format, which includes a single visual
- Video Ads: A compelling ad format with endless potential. Keep the message short, and don’t forget to add subtitles to increase engagement.
- Collection Ads: This new ad format is gold for e-commerce companies, allowing you to showcase multiple products in one dynamic set
You can refer to this table for a better understanding. It outlines the ad formats supported by each Facebook objective.
Step 7: Choose an Image and Add Your Copy
This section is where you’ll add everything from your images to your ad’s call to action (CTA). Simply start with the ‘Add Media’ dropdown and work your way down until you’re staring at that ‘Publish’ button. I’ll break down each category here:
- Media: Add your images or videos. Include multiple creative assets and customize them for the supported placements.
- Primary text: This section has the most impact. Grab your audience’s attention and convince them why they need to click. Include a CTA so they know what to do next.
- Headline: Depending on the ad format, you’ll have a 25-30 character limit. However, as with most copies, we find shorter messages are the most effective ones.
- Description: Sometimes this will show, sometimes it won’t. Make sure you highlight the bigger picture of your business or your primary offer here.
- Website URL: Copy and paste your website URL here. This section is a great time to consider URL parameters if you haven’t already.
- Display link: This is the shortened link for ad placements with limited space.
- Call-to-action: This button directs the audience to take a specific next step. Make sure your CTA and destination match. For example, don’t use the ‘Contact Us’ CTA if the link brings a user to an eBook download page.
Don’t forget to look at the preview panel on the right side of the page. Check to see what the ad will look like and edit until you’re satisfied.
Even though the process is pretty easy in Ads Manager, be very thoughtful about the media and copywriting you include in the ads. Like the rest of the social media strategy, make each post as engaging as possible. Besides the tips we had above, check out these social media tools and best practices for your ad images and copy.
Step 8: Place the Order for Your Ad
Creating your first ad is a significant milestone! Make sure you select the ‘Facebook Pixel’ checkbox and hit the ‘Place Order’ button before leaving the page. Facebook will take a minute to approve your ad before it goes live, so be patient.
Most likely, you’re not going to be a Facebook Ads wizard after your first campaign, so take time to watch out for common ad mistakes most people make when starting.
Step 9: Monitor Facebook Ads Campaign Performance
Now that you have ads running, it’s essential to keep track of how your campaign progresses. After all, you want to know how your ads drive impact for your business.
So, where can you access Facebook Ad campaign analytics?
Luckily, everything you need is in Facebook Ads Manager. We mentioned this earlier in our overview of Facebook Ads Manager Tabs. As a review:
- The Account Overview tab gives you a bird’s eye view of your account performance. It includes essential metrics such as overall reach, cost data, and demographic breakdowns.
- Click the Campaigns tab to see relevant results for each campaign you’re running.
- Ad Sets show ad set performance across or within campaigns.
- Click on Ads for the most granular reporting view — real-time analytics on single ads’ performance.
Additionally, here are the steps to see ad performance:
Step 1: Go to Ads Manager.
Step 2: Select the level you want to analyze campaigns, ad sets, or ads.
Step 3: Click the ‘View Charts’ button on the right panel to visually see your performance.
Step 4: Review data on the Performance, Demographics, Placement, or Delivery of the campaign, ad set, or ad you select.
After you run ads for a while, you’ll quickly see what metrics are most important to your business. You can customize to see any performance metric column. For example, if I’m trying to increase traffic to my website for a particular campaign, I might want click-through-rate (CTR) front and center.
Simply click the Campaigns tab, the Columns dropdown, and choose Customize Columns.
Pick which columns you want to see, and check the Save as a preset checkbox to use this view again later. Don’t forget to click Apply.
Don’t forget why you analyze performance in the first place: to improve performance going forward. The constant process of testing, analyzing, and optimizing will help you scale your Facebook ads and ultimately result in growth for your business.
Conclusion
Facebook Ads Manager is an excellent tool to keep your ads in check. The right mix of organic posts and ads on Facebook can definitely bring you qualified leads and branding you have always wished for.
But excelling in one platform is not enough. You need to have multiple touchpoints if you want to tick more boxes on your checklist.
Optimize your posts to specific platforms, schedule at varying times, gauge your analytics, and create White Label reports in just a few clicks. Take your free trial to unlock the new way of marketing!
Pingback: Promote Facebook Groups with Ads in FB Ads Manager : Ankita Mankotia
Pingback: Compare Attribution Settings: Get the Most of Conversion Data : Ankita Mankotia
Pingback: Meta Conversion Events: How to Test Them : Ankita Mankotia
Pingback: Facebook Ads for Real Estate Agents – The 5 Best Examples : Ankita Mankotia
Pingback: FB Ads for Real Estate: 8 Tips for Finding Success : Ankita Mankotia
Pingback: 5 Facebook Automated Rules to Control Your Ad Spend 24/7 : Ankita Mankotia
Pingback: FB Lead Ads: Pros, Cons, and Best Practices : Ankita Mankotia