

You’ve seen FB retargeting ads, even if you didn’t know that’s what they’re called. They’re those ads that seem to follow you around the internet, showing you that product you left in your cart without checking out or the brand that you liked on Facebook. Retargeting ads are definitely something you’ll want to add to your marketing toolkit and we’re going to show you exactly how to get started with FB retargeting ads so you can boost your conversions.
What Is Retargeting?
Retargeting ads are ads you show only to those who have already interacted with your brand in some way. For FB retargeting ads, you use Facebook’s pixel to track the activity on your site and use the information you gather to segment visitors and create ads for that audience to keep your brand at the front of their minds.
Does Retargeting Really Work?
In a word, yes.
Facebook ad retargeting is considered “warm” advertising because you’re showing ads to people who have already shown that they’re interested in your brand or products. Since the audience for your retargeting ads is already familiar with your brand, these ads tend to have a higher conversion rate and better ROI than traditional ad targeting.
Instead of “do retargeting ads work?” the question becomes “how well do retargeting ads work?” Pretty well, it seems.
According to Growthbadger, consumers are 70% more likely to convert when they’re retargeted. Plus, research from connectIO indicates that retargeting ads are 76% more likely to get clicks than display ads. Add in the lower cost per acquisition of retargeting ads (32% lower than CPA for regular search and 65% lower than regular display), and you’ve got an advertising method that demands attention.
Getting Started With FB Retargeting ads
Convinced that FB retargeting ad is what your business needs to level up your advertising efforts? Like most social media marketing platforms, Facebook Ads is relatively straightforward and easy to use. In this section, we’ll walk you through 7 steps to launch your first Facebook retargeting ad.
1. Set up the Facebook Pixel on Your Site
The first thing you’re going to want to do is to install the Facebook Pixel on your website. This is a snippet of code for your site that lets you track and measure activity on your site so you can build and optimize audiences for your Facebook ad campaigns. Without installing the Facebook pixel, you won’t be able to track your site’s visitors or see how they’re using your site (what actions they’re taking).
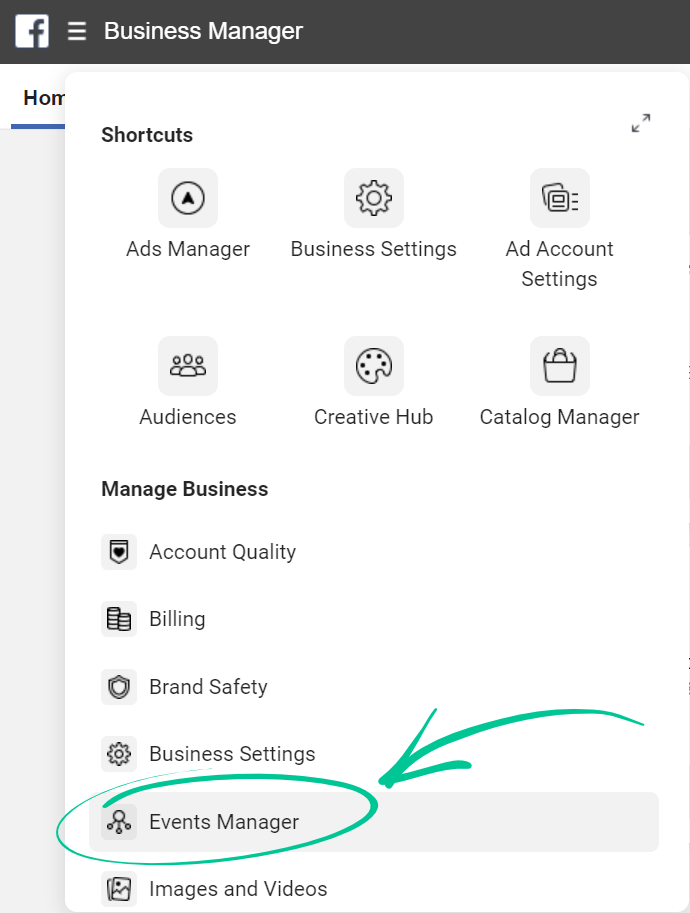
To set up the Facebook Pixel, log in to Facebook Business Manager then choose Events Manager from the menu:
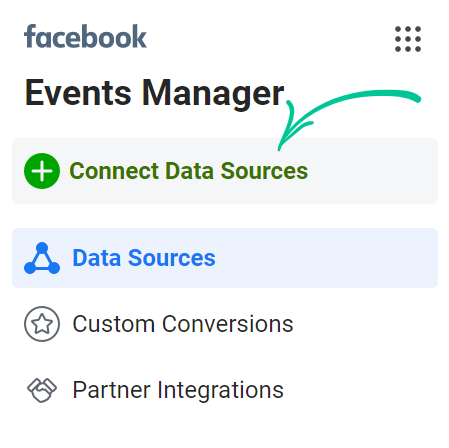
From the left-hand menu, click Connect Data Sources:
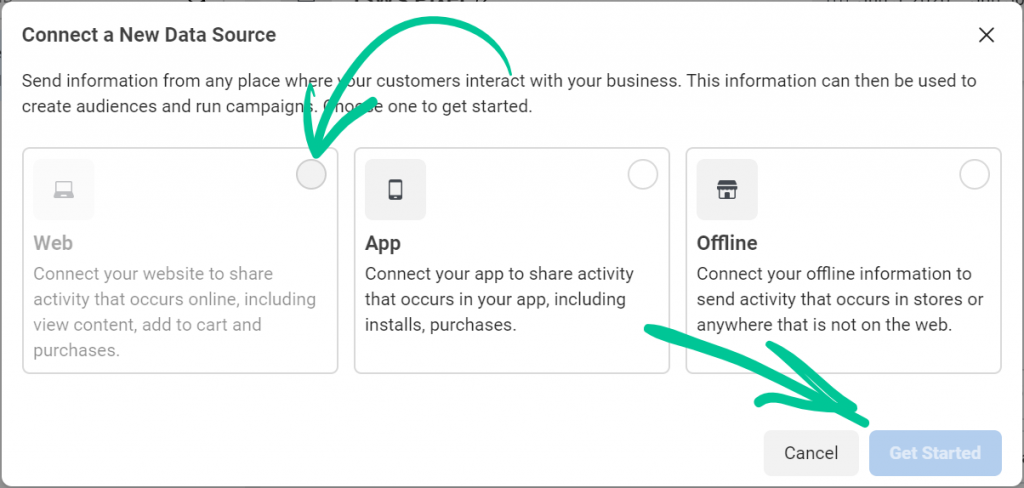
Select Web (you can only have one Facebook Pixel per account so in our example, the Web option isn’t available) and click Get Started:
From there, just follow the process that Facebook lays out to create your pixel.
After your pixel has been created, you’ll need to install the pixel on your site. There are a couple of ways you can do this, but if you’re even the slightest bit tech-savvy, just copy and paste the Facebook Pixel code between the tags on your site’s HTML. Or, you can use a WordPress plugin like Insert Headers and Footers to do the same thing.
You may also want to use the Facebook Pixel to record specific actions that people take while on your site. This could be viewing content, adding an item to their cart, initiating a checkout, completing a purchase, and more. It will require a few more lines of code, but Facebook makes this entire process really easy for you.
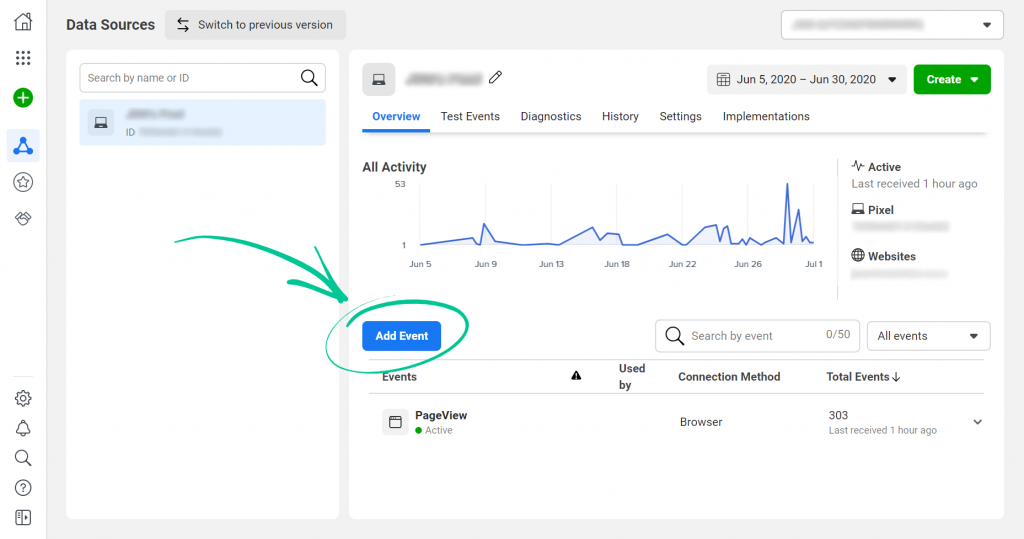
To add event tracking, click Add Event on your pixel Overview page.
You’ll have the option to add the code to your site manually, use a partner integration (like WordPress, Shopify, Kajabi, and others), or email the instructions to your web developer team. No matter which option you choose, Facebook’s instructions are top-notch.
Once you’ve got your Facebook Pixel set up, you’re ready to start creating retargeting ads.
2. Create a Custom Audience
As the Facebook Pixel works to gather more information about your visitors and the actions they’ve taken on your site, you’ll see the audience available for retargeting begin to grow. To leverage this audience, you’ll need to create a Custom Audience. To do this, go to the Audiences section of Facebook Ads Manager:

To create a custom audience for your Facebook ad retargeting, click Create Audience and choose Custom Audience:
There are several ways you can use your own sources to build a custom audience:
- Website traffic: retarget anyone who’s visited specific pages on your website during a certain timeframe.
- An existing customer list: use existing customer data to create a custom audience.
- App activity: retarget anyone who’s used your app during a certain timeframe.
- Offline activity: retarget people who’ve engaged with your business offline (similar to using an existing customer list).
Just choose the source you want to use and you’ll be able to set up your custom audience, adding and excluding people to expand or narrow your retargeting ad’s reach. The parameters you have to work with will change depending on the source you choose.
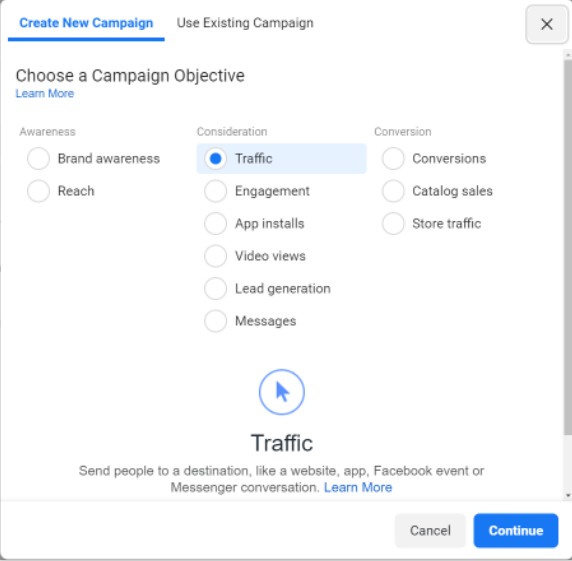
3. Set Your Campaign Objective
After you have your custom audience built, it’s time to choose a campaign objective. The two most popular campaign objectives are Traffic and Conversions. The objective you choose is largely dependent upon how much traffic you already have on your site or what type of business you have.
Traffic
Your goal is to get retargeting audiences to return to your website. This objective will encourage people to visit your store.
Conversions
With this objective, you’re pushing your retargeting audience towards completing a purchase or other desired action. Note: you will need to have event tracking set up for this objective.
To get started, go to Facebook Ads Manager, click Create, and choose your objective:
4. Set a Budget
After you’ve chosen your objective, you’ll need to fill out additional details about your ad. Give your ad a memorable name and choose your buying type. Depending on the objective you chose in the previous step, you may only have certain buying types available:
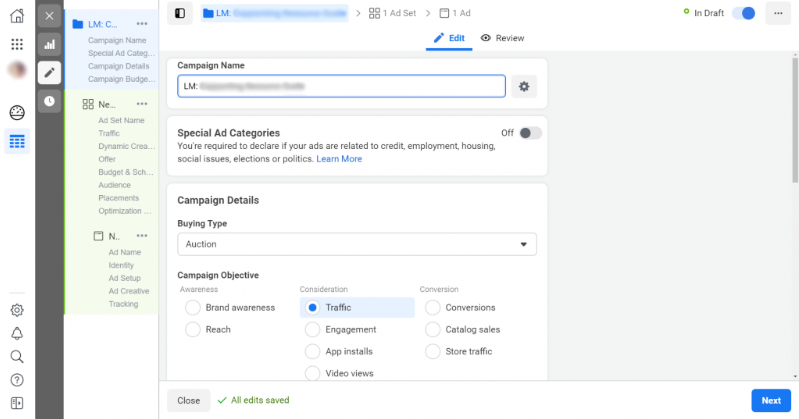
Click Next and add a name for your ad set. Then, choose where you want to drive traffic (your website, app, Messenger, or Whatsapp). Feel free to use Dynamic Creative or Offers, too. What we’re most interested in here, though, is setting a budget.
You can choose to set a daily or lifetime budget for your ad, as well as a start and end date:

We’re not going to get into how much you should spend on your Facebook ad retargeting. It varies widely based on your business, industry, overall marketing budget, and other parameters specific to your business.
Once you’ve gotten your budget worked out, you’re ready to add your audience.
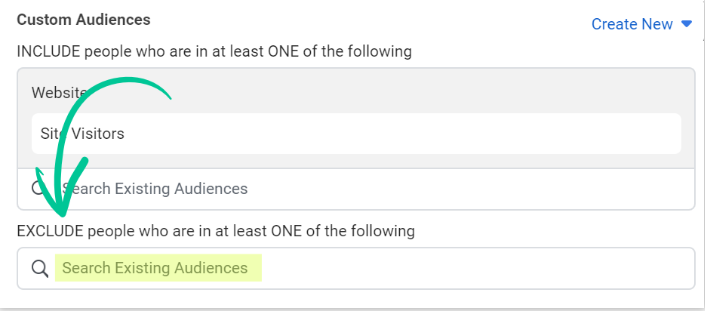
5. Assign Your Custom Audience
Now it’s time to put that custom audience to use. To add the custom audience you created earlier, click in the Search Existing Audiences search bar and it will bring up a list of your custom and lookalike audiences. Choose the custom audience you want to use for your retargeting ad.
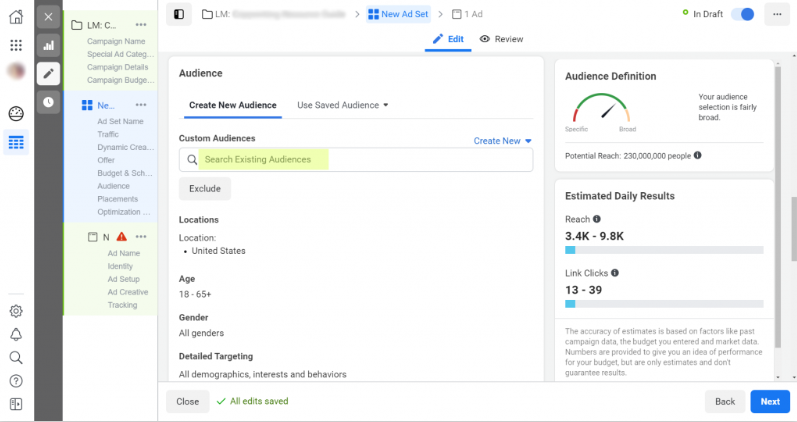
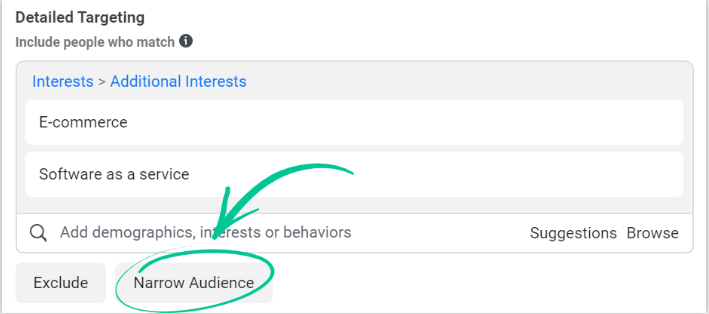
You also have the option to further refine your retargeting audience based on demographics, interests, and behaviors:
On the right-hand side of the page, you’ll see how your changes impact your retargeting audience size as well as estimated daily results for your retargeting ad. If the audience is smaller than you want, you might be able to increase it by editing the timeframe you used when creating your custom audience (changing “with the last” number of days to a higher number).
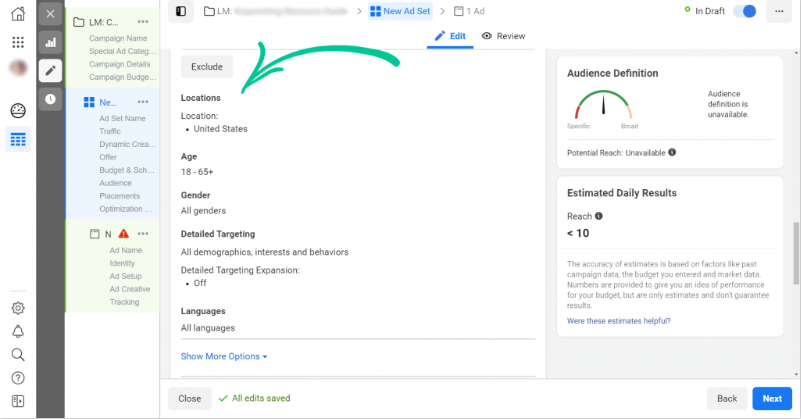
Excluding Audiences
What happens when you’re running multiple ads for multiple audiences? It’s entirely possible that you’ll have people who overlap the two audiences you’re targeting. Those folks are going to be counted for each custom audience.
Why does that matter?
For starters, you’re going to be showing the people who overlap your custom audiences more ads. This could result in ad fatigue and they’ll either start ignoring your ads or they’ll opt-out of them entirely.
It also matters when it comes time to pay and bid for your ad. If you have overlapping audiences you’re essentially paying to target certain people twice. You could also end up bidding against yourself!
Fortunately, there’s a way to work around this overlap by excluding custom audiences. To do that, just click the Exclude button under the Custom Audiences field and exclude the group that overlaps with the group you’re retargeting.
Advanced Targeting
If you have a lot of unqualified traffic coming into your site, you can use advanced targeting to only show your retargeting ads to the people most closely related to your ideal customer. To do this, use the Narrow Audience option under the Detailed Targeting section:
6. Choose Your Ad Placements & Delivery
So far, you’ve set up your Facebook Pixel, created a custom audience, chosen a campaign objective, set your budget, and assigned your custom audience to your ad. Now it’s time to decide where you want your ad to show up. You have several options, from Facebook in-stream video ads to Instagram feeds.
Don’t overthink this. We recommend just sticking with automatic placements.
Automatic placements let Facebook work to get the best results for your ad by choosing results from the widest range of placements possible. Using automatic placements is typically the best and most efficient use of your ad budget. Facebook’s delivery system is designed to get you the most optimization events at the lowest overall cost, rather than the lowest average cost for each placement.
While there are certainly times you might want to pick your own ad placements (if you’re targeting a specific location, device, or platform, for instance), for most of your ads, automatic placements are going to get you the best return on your investment.
The last thing you’ll need to do is set up optimization and delivery options. This tells Facebook to get you as much of a specific result as efficiently possible. Depending on your campaign objective, you’ll have different options.
With the traffic objective, for instance, you can optimize for:
- Landing Page Views: Facebook delivers ads to the people who are more likely to click on your ad’s link or load the Instant Experience.
- Link Clicks: Ads will be delivered to the people most likely to click on them.
- Daily Unique Reach: Ads will be delivered up to once a day.
- Impressions: Facebook will deliver ads to people as many times as possible.
You also have the option to set up a cost control, but this probably isn’t necessary since Facebook automatically works to spend your entire ad budget and get the best results using the lowest cost bid strategy.
7. Design Your Ad
Designing a Facebook ad for retargeting is just like creating any other Facebook ad. We have a full rundown of how to create and design a Facebook ad in our beginner’s guide to Facebook advertising. Head on over there for a step-by-step guide. Here’s the process in a nutshell:
- Decide if you’ll create an ad from scratch, use an existing post, or use a mockup you created with our free Facebook Ads Mockup tool.
- Select your Facebook ad format: single-image, carousel, collection, etc.
- Choose the media you want to use for your retargeting ad, paying attention to Facebook ad size constraints.
- Add text and links to your Facebook ad.
- Finish up with a strong call to action.
Once you’ve got everything set up the way you want (you can use one of these awesome Facebook ad preview tools to make sure), click Confirm. Your ad will be reviewed and then your retargeting audience will start to see them.
Wrapping Up
FB Retargeting ads is a fast and easy way to get the sales and conversions you need to keep your business growing. With a Facebook ad retargeting strategy like the one we’ve outlined here, you’ll be on your way to getting the best ROAS (return on ad spend).
To make your FB retargeting ads simply irresistible, check out these Facebook advertising tips.