We’re seeing a huge surge in Facebook ad accounts getting shut down at the moment. One potential solution that seems to be helping some advertisers: Business Verification in Facebook Business Manager.
There could be many factors contributing to the shutdown of Facebook ad accounts. Maybe you’ve actually violated advertising policies. If that’s the case, it’s something that you need to sort out with Facebook.
But maybe you’ve done nothing wrong and your account is getting flagged incorrectly. That’s actually quite possible at the moment, given what we’re seeing. It could be related to election season and greater scrutiny, particularly if the content in your ad is at all related to politics or social issues.
It may be related to the fact that Facebook is short-staffed during the pandemic and relying heavily on automated processes. This can result in a frustrating feedback loop.
We have heard, though, that Facebook reps in these situations are often asking advertisers to get their businesses verified. We’ve even seen some cases where advertisers had their businesses verified without prompting, and their ad accounts were later reactivated.
That doesn’t mean that business verification is the magic bullet. While it may not lead to the results you want, it makes sense that Facebook would look more favorably on verified businesses than on unverified businesses.
Let’s walk through business verification…
What is Business Verification?
Business Verification allows you to verify that a Facebook Business Manager account is owned by a specific business.
In order to verify your business, be prepared to provide the following information:
- Proof of identity (government and non-government IDs)
- Legal details of your business (business name, address, contact info)
- Proof of access to the business (receive a phone call/text or email; domain verification)
Now, let’s walk through the steps of verifying your business…
How to Verify Your Business
First, go to your Business Manager and click on Security Centre


Click the button to “Start Verification.”
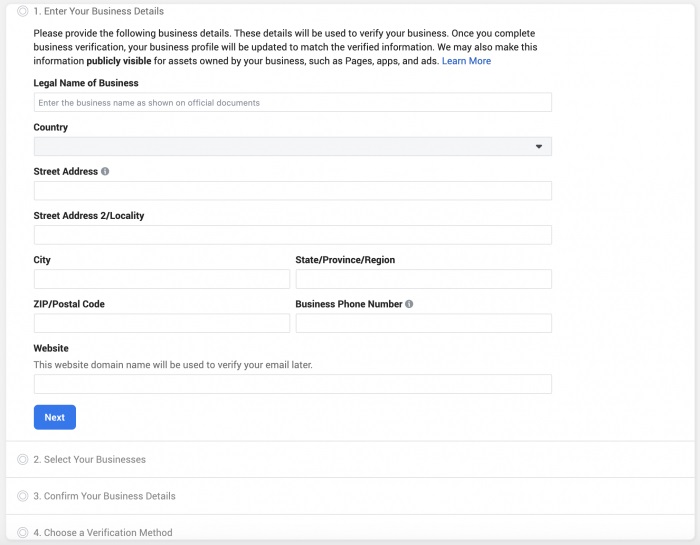
You’ll have a four or five-step verification process that should look like this…


1. Confirm Your Identity.
Not everyone will have this step. It’s most likely to appear if you need to appeal a decision to ban your account.
You’ll need to upload a photo ID or two forms of non-photo identification. You won’t be able to move to the next step until Facebook has reviewed this submission.
2. Enter Business Details.
This includes legal business name, address, phone number, and website.
3. Select Your Business.
Facebook will generate a list of legal businesses that match your submission. Select the correct business from the list.
If your business does not appear, you’ll need to upload official documents. If approved, you won’t need to proceed with the following steps.
4. Confirm Your Business Details and Get a Verification Code.
Select a phone number that you have access to, and click “Next.” Choose to receive a verification code via text, call, or email (a call may not be available in all countries). Then check your phone or email to complete the verification.
5. Verify Your Domain.
You can also verify your domain instead of going through Step 4. This requires you to add some code to your official business website. Verifying your domain is a good idea generally, even if you don’t for the purposes of business verification.
Provide Accurate Information
If you’re inclined to provide inaccurate information in the verification process for any reason, think twice. From Facebook
Note that if you provide false or misleading information during your verification process, attempt to claim and verify a business you aren’t authorized to represent, or otherwise attempt to circumvent our verification review systems, Facebook will remove your business’s verification status and may take additional action on the account.
If it’s not clear to you yet, unethical behavior will catch up to you. You may be rewarded for a short period of time. But the minute you are flagged by Facebook, you are going to struggle. You may never get your account back.
Why Does Verification Matter?
If you connect your business to an account, it makes it easier for Facebook to assign responsibility. It makes it much more difficult to try to evade Facebook and circumvent rules.
Understand the issues Facebook deals with related to fraud and bad actors. If they are unable to assign responsibility, it’s easy for a business to simply set up new pages, profiles, and ad accounts. If Facebook flags a business, you’ll need to verify a new business.
Ultimately, Facebook should look more favorably on any verified business. But it also means that you need to be ultra-careful if you aren’t already. You need to follow the rules.


Pingback: Facebook Domain Verification: Link Ownership Control - Ankita Mankotia
Thanks for your marvelous posting! I seriously enjoyed
reading it, you are a great author. I will make certain to bookmark your blog and will often come back
very soon. I want to encourage yourself to continue your
great job, have a nice holiday weekend!